Building a Fence (without Concrete)
We found out, according to our city Bylaws, we could move our fence out a considerable distance, to enlarge our backyard for our kids.
So we were able to reuse some of the old fence, and then purchased more material to finish the rest.
I researched alot about how to secure fence posts. I settled on what I felt was most reasonable. The problem we have in Canadian Winters fence posts shift when water gets under the cement and freezes. This means each year you may or may not have to adjust your fence, or in some cases dig out the old post and put in new. The method I found to counter this (as much as possible) was to use compacted gravel instead of cement to secure the posts in place.

But I will get to that. Lets start with the basics of building a fence:
Bylaws:
First, make sure to check your municipality for exact bylaws on fences. Some require a permit, others do not. Some have specific areas you are not allowed a fence, and others say your fence can only be a certain size or type.
For us, we were allowed to be 5 feet from the property line. And we could only build our fence up to 6 feet high.
Stake it:
Now that you know where you can build a fence and how high it can be, make some wooden stakes and hammer them into the ground where your fence line will be. You will need to measure off a common point to ensure your fence is square. We used our house and the curb at the street (measure back at several points along the curb to our property line). Once you have a few stakes hammered in at all corners, take some string and tie it from one stake to the next. This will be your guide line for where your fence will go. This helps keep your fence straight.
Section Sizing:
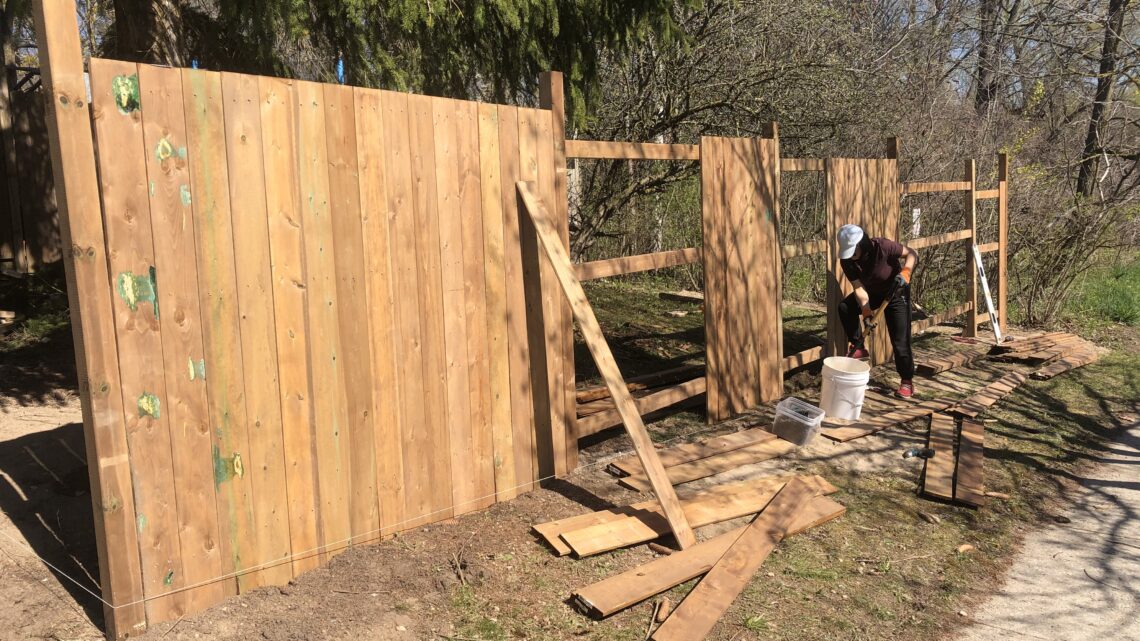
Now, decide how big of a section you will make between each fence post. I used 4×4 posts, with 2×4 run horizontally as my structure. Then I screwed fence board straight to that. This gave me a fairly private fence. Because of this design, I felt that a maximum of 8 feet between posts was appropriate. Anything wider may not be strong enough.
Mark Post Locations:
Now that you know your spacing, measure out your post locations, marking them with stakes as well. (You may not have even spacing the entire run, so decide where best to have shorter sections, as it may effect your appearance and structure).

Dig:
You will need to dig to put in your fence posts. It is generally recommended you dig deep enough to be past your local “frost line”. For us, our frost line is about 3.5 feet. This means, you want to get your posts footing lower than that. So we dug 4 foot deep holes.
You have a few options.
- you could dig it by hand. However, the more you dig away the compacted ground, the less natural support you have in the ground. Best to dig the narrowest hold you can. To dig by hand you could carefully use a shovel, but you may not get very deep. There is also something called a “post digger” which is created to dig straight down several feet. It is useful, but depending on your soil, it may be very time consuming to dig by hand this way.
- another option is the rent a gas post digger. There are a few styles to choose from, a 1 man auger, a 2 man auger, even a trailer mounted auger. Depending on your skill level, you may want to speak with your Rental Company as to what choice is best. We used Home Depot Rentals, and rented a 1 man auger. I am a large guy, used to doing maintenance work, and this still threw me around a bit. Remember you are digging a deepish hole here, and this unit is spinning, once it hits a tree root or rock, it can kick back pretty quick.
- another option would be hire out the work. If you lay out the post locations, and simply hire a company to come and dig your holes, it would still be cheaper than hiring the entire job out.
If you choose to dig the holes yourself, I want to share a few pointers I learned along the way. We used a 1 man auger. We dug about 12 holes. Our terrain in Kitchener is about 3′ of rock and dirt, then you usually hit sand. The auger itself is not overly heavy, but it can quickly get stuck and kick back at you. You will need to go slowly, and as you find rocks, dig away some, then use the auger, then dig out some rocks, then auger, etc. We found using a large metal pole or wrecking bar worked best. You could try a shovel too. Try not to widen your hole any more than you need though if using a shovel. Realize that this part takes the most time. I thought I would get all 12 posts dug in less than 4 hours, it took me nearly 10 hours. We had alot of rock.

Lay the Base:
Once your holes are dug, you will need to make some sort of a base. I used any large stones I had dug up. I simply tossed them back in the bottom of the hole. You want a good 6-10 inches of base in there. Then use the post itself, or a scrap length of 2×4 and hammer striaght down in the hole. You will be tamping those rocks down. Then take some loose gravel and fill in around your stones, and tamp again. Now your post will have a good base to rest on. And because you used loose gravel it allows for better drainage than concrete, so the chances of water getting under it and freezing is less, which means your post will not come up in the winter causing your fence to sag.

Drop in the Post:
Once your base is tamped, set your post in the hole. You then should use a level to ensure the fence post is plumb. (We used two long levels on either side of the post to make sure we were as straight as we could get.)
You can use some temporary braces out of scrap wood here to hold it stright, or if you have a helper, have them hold it straight as you fill in the hole with more loose gravel.

Backfill your Post:
We chose to use compacted gravel to secure our post, instead of filling our post hole with cement or foam. This allows for the any water to naturally drain away, and lowered the chances of water pooling underneath and freezing in the winter. If you add about 6-10 inces of gravel around your post, and then use a 2×4 to tamp it down securely, and repeat this until you fill the hole, it will keep your fence post very secure. Once you get to the last 4-6 inches, you can cover the gravel with dirt if you want it to look nicer. (It has been two years since we made our fence, and it did not move, nor loose its sturdiness). Remember too, once you start adding fence boards and connect your corners together, the fences really strengthens up.
If you choose to use cement or foam instead, then fill it in around your post at this time. But you will need to allow it time to dry after this step. Cement takes several days to properly cure. The foam will depend on manufactures recommendations, make sure to check the label. My guess would be around 24 hours, but it could be sooner.
Connect Posts:
Once your posts are in place, you will need to connect them with horizontal beams. I chose 8 foot centers with my fence, so I installed three 2×4’s between each post. I could have gotten away with 2, but I felt with 3 it would keep my fence boards from buckling.

You can purchase fence hangers for this part, then are very inexpensive and hold your fence runs together very well.

Fence Boards:
Once your connect all your horizontal runs between all your fence posts, you can start screwing your fence board on. There are several patterns people use, but we just chose to push our boards tight together. We wanted as much privacy as we could get. If you are using new boards, pressing them tight together will still end up giving your a small space inbetween boards in the end. This is because new wood still contains alot of moisture. Once it drys out after seveal months outside, it will natually shrink, causing gaps between boards. So, that being said, if you prefer to have a gap, just remember it will happen naturally, so you may not necessarily need to measure for gaps as you install. Unless you wanted a much larger gap that 1/4″.

Finishing Touches:
Once your fence is all put together. You will need to look at your posts and possibly cut off the tops to make them look more even. This can be done carefully with a circular saw.
If your property is not flat, you may need to stagger your fence like we did. Our property was a downward slope, so every 8 foot section of horizontal fence, we dropped several inches. And as I put up the fence boards, I made sure to step each piece down to the ground. Take your time with this and make a nice even looking pattern.

Clean up your stakes and string. Return all your tools. And you are done!
Final tips:
- wear gloves when working with pressure treated wood, if you get a sliver it hurts more than normal wood
- if you have trouble getting a large rock out of the post hole, and a shovel won’t reach, try using some rope or straps to tie around the rock and lift out.
- keep checking your string as you set your posts, double check nothing is holding your string in the wrong place, you want your posts to all line up nicely in the end
- if you cannot sink your posts to the frost line, it will likely start to heave out of the ground after a few years. Take the time to do it right the first time.